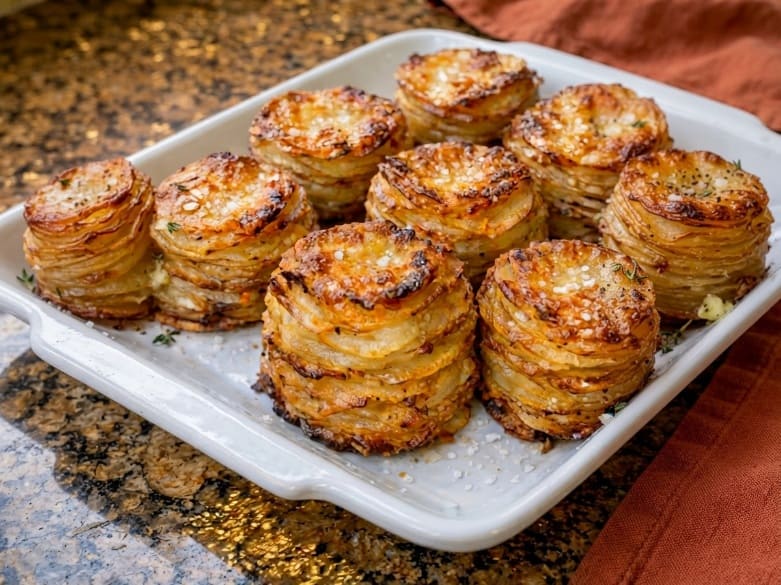
If you’ve been searching for an easy cheesy potato stacks recipe, this one is worth saving. Cheesy potato stacks are the kind of snack that disappears off the platter quickly. They’re crispy on the edges, cheesy in the middle, and golden on top, making them a great option for appetizers, side dishes, or gatherings.
Think of them as a combination of crispy potato chips and classic scalloped potatoes, baked into individual portions using a muffin tin, thinly sliced potatoes, butter, and cheese. They’re simple enough for a weeknight side dish, but showy enough to earn a spot on any party table.
Whether you’re planning a game day spread, a holiday appetizer table, or just want a fun new way to eat potatoes, this recipe checks every box. Let’s get into why these stacks deserve a permanent spot in your recipe rotation — and exactly how to make them.
Why You’ll Love This Recipe
There’s a reason crispy baked potato stacks with cheese have become such a popular party staple. A few reasons, actually:
They’re incredibly simple. You need a mandoline (or a steady hand with a knife), a muffin tin, and a handful of pantry staples. No complicated techniques, no fancy equipment, no stress.
They’re endlessly customizable. Swap the cheese, add bacon, toss in some herbs — this recipe is more of a template than a strict rulebook, so you can make it your own.
They’re perfectly portioned. Because they bake in a muffin tin, each stack comes out as its own self-contained, grab-and-go bite. No slicing, no serving spoon required, no mess.
They reheat well. Unlike many potato dishes, these maintain their texture well when reheated.
If you’re looking for a potato appetizer for parties, this recipe offers an impressive presentation while keeping the preparation simple.
Ingredients You’ll Need
Here’s what goes into a classic batch of mini cheesy potato stacks (this makes about 12, enough for a standard muffin tin):
• 4 medium russet or Yukon Gold potatoes, thinly sliced (about 1/8-inch thick)
• 4 tablespoons unsalted butter, melted
• 2 cups shredded sharp cheddar cheese
• 1/2 cup grated Parmesan cheese
• 2 cloves garlic, minced
• 1 teaspoon smoked paprika
• 1/2 teaspoon garlic powder
• Salt and black pepper, to taste
• Fresh chives or parsley, chopped, for garnish
• Sour cream or ranch dressing, for dipping (optional but highly recommended)
A mandoline slicer makes quick work of getting those potatoes thin and even, which matters more than you might think — uniform slices are the secret to stacks that cook evenly and crisp up the way they should.
Step-by-Step Instructions
1. Prep Your Potatoes
Wash and dry your potatoes, then slice them thin using a mandoline or a sharp knife. You’re aiming for slices thin enough to bend slightly without snapping — around 1/8-inch is the target. Don’t peel them unless you prefer a smoother texture; the skins add a bit of extra crunch and hold everything together a little better.
2. Make the Butter-Cheese Mixture
In a large bowl, whisk together the melted butter, minced garlic, smoked paprika, garlic powder, salt, and pepper. Add the potato slices to the bowl and toss gently until every slice is coated. This step is what gives crispy baked potato stacks with cheese their deep, savory flavor all the way through, not just on the surface.
3. Layer the Stacks
Preheat your oven to 400°F (200°C) and grease a standard 12-cup muffin tin well — this part matters, since sticking is the most common thing that goes wrong here.
Working one cup at a time, layer a few potato slices in the bottom, sprinkle a pinch of shredded cheddar and Parmesan over them, then add a few more potato slices. Repeat this layering until each cup is filled and you’ve used up your potatoes and most of your cheese, saving a little cheese for the top of each stack.
4. Bake to Golden Perfection
Bake for 35–40 minutes, until the tops are deeply golden and the edges are crisp. If you want an extra-crunchy top, switch the oven to broil for the final 2–3 minutes — just keep a close eye on them so they don’t burn.
5. Cool, Garnish, and Serve
Let the stacks rest in the tin for about 5 minutes before removing them. This resting time lets the cheese set up a bit, which makes the stacks much easier to pop out cleanly with a small offset spatula or spoon. Garnish with chopped chives or parsley, and serve warm with sour cream or ranch on the side for dipping.
Tips for the Crispiest, Cheesiest Stacks
• Slice evenly. Uneven slices cook at different rates, leaving you with some stacks that are mushy and others that are overdone.
• Don’t skip the grease. A well-greased tin (or a light spray of nonstick cooking spray) is the difference between stacks that pop right out and stacks that stay stuck to the pan.
• Use freshly shredded cheese. Pre-shredded cheese may contain anti-caking ingredients that can affect how smoothly it melts, so grating your own block cheese can give you a creamier result.
• Let them rest before serving. Straight out of the oven, they’re fragile. A few minutes of resting firms them up considerably.
• Double the batch for parties. If you’re serving a crowd, consider making two tins’ worth.
Fun Variations to Try
One of the best things about this recipe is how easily it adapts. Here are a few twists worth trying:
• Bacon Cheddar Stacks: Add crumbled cooked bacon between the layers for a smoky, savory kick.
• Loaded Stacks: Top with a dollop of sour cream, extra shredded cheese, and green onions right after baking, just like a loaded baked potato.
• Spicy Jalapeño Stacks: Add thin jalapeño slices between the potato layers for some heat.
• Herb and Gruyère Stacks: Swap the cheddar for Gruyère and add fresh thyme or rosemary for a more elevated version.
• Mini Stacks for Kids: Use a mini muffin tin instead of a standard one for bite-sized portions that are easy for little hands to grab.
Serving Suggestions
These stacks work well in almost any setting. Serve them as a side dish next to grilled chicken or steak, set them out as an appetizer with a few dipping sauces, or add them to a holiday spread alongside other finger foods. They also hold up nicely on a potluck appetizer table, since they taste great warm or at room temperature — one less thing to worry about while you’re juggling everything else.
Storage and Reheating
Leftover stacks can be stored in an airtight container in the refrigerator for up to 4 days. To reheat and bring back their crispy texture, pop them in the oven at 375°F for about 8–10 minutes rather than using the microwave, which can make them lose some of their original texture. You can also freeze baked stacks for up to 2 months — just thaw them in the fridge overnight before reheating.
Frequently Asked Questions
Can I make these ahead of time?
Yes. You can assemble the stacks in the muffin tin up to a day in advance, cover, and refrigerate, then bake when you’re ready to serve.
What’s the best cheese for potato stacks?
Sharp cheddar and Parmesan are a classic combination, but Gruyère, mozzarella, or Monterey Jack all melt beautifully too.
Why are my stacks falling apart?
This usually means they haven’t rested long enough after baking. Give them at least 5 minutes in the tin before removing.
Can I make these without a mandoline?
Absolutely — a sharp knife and a steady hand work fine, just take your time to keep the slices as even as possible.
Final Thoughts
Cheesy potato stacks are proof that you don’t need a complicated recipe to make something genuinely crave-worthy. With crispy edges, a cheesy center, and a golden top, they’re a great choice whether you’re feeding a crowd or preparing a simple meal at home.
This easy cheesy potato stacks recipe is a simple addition to parties, potlucks, and family meals.