Why This Recipe Works
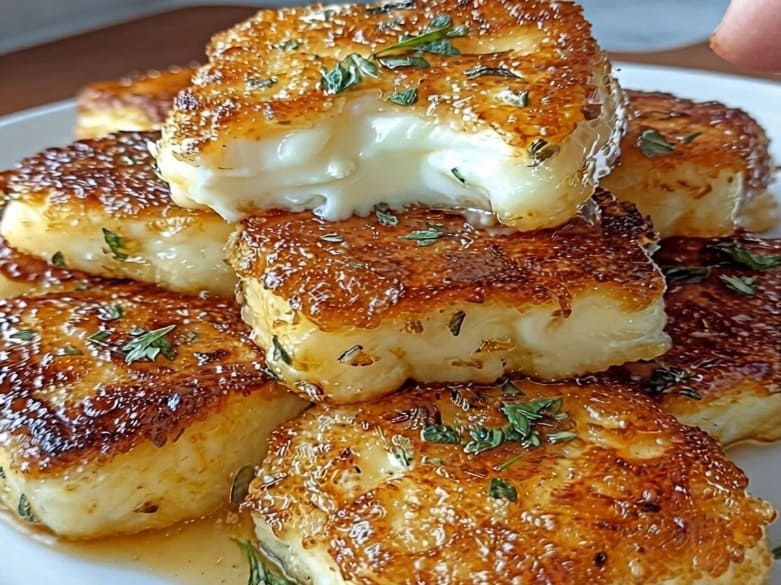
Halloumi is a semi-hard cheese, usually made from a mix of goat’s and sheep’s milk, and it’s got one seriously cool party trick: it refuses to melt the way normal cheese does. Instead of turning into a puddle, it gets a deep golden crust while staying soft and chewy underneath. That’s the whole appeal of crispy halloumi — crunchy on one bite, squeaky and gooey on the next.
Since the cheese is already salty and rich on its own, you really don’t need to fuss with it much. Toss it in a hot pan for a few minutes and you’re basically done. No batter, no coating, nothing sticky to clean up afterward. And because the method itself is so simple, it slots right in if you’re building a spread of flavorful vegan recipes for friends — just know the halloumi itself is dairy, not vegan, so it’s more of a supporting player alongside the plant-based stuff.
The real reason I keep coming back to this dish, though, is how easily it fits anywhere. Appetizer, sandwich filler, salad topper, side dish next to some roasted veggies — once you’ve got the technique down, you’ll find an excuse to make it constantly.
Ingredients You’ll Need
Here’s the entire grocery list for this one:
• Halloumi cheese — one 8-9 oz block, sliced into ½-inch thick slabs
• Olive oil (or avocado oil) — just enough to coat the pan
• Lemon — for a bright squeeze at the end
That’s genuinely it. You can crack some black pepper over it or drizzle on a little honey after cooking if you’re feeling fancy, but the base recipe stays this simple on purpose.
A Quick Note on Choosing Halloumi
Not all halloumi is created equal, unfortunately. You want a block that feels firm and a little springy in the package — that’s your sign it’ll hold together in the pan instead of falling apart. Cheap halloumi can turn rubbery when fried, so if you’ve got the option, grab a decent brand from the cheese counter or a Mediterranean grocery store. Worth the extra buck or two.
How to Make Pan-Fried Halloumi
Step 1: Slice the cheese. Pat the halloumi dry with a paper towel — this is key for getting that crisp instead of a soggy steam situation — then slice it into slabs about ½-inch thick. Go thinner and it’ll crisp up quicker but can dry out; go thicker and you’ll get a gooier center.
Step 2: Heat the pan. Grab a non-stick or cast iron skillet and get it going over medium-high heat. Add just enough oil to coat the bottom. You’re searing here, not deep frying, so don’t go overboard.
Step 3: Fry until golden. Lay the slices in the pan with a little breathing room between them and leave them alone. Let each side go undisturbed for 2-3 minutes until it turns a deep golden brown. I know it’s tempting to poke at it, but patience gets you the good crust.
Step 4: Squeeze and serve. Once both sides are golden, plate it up and hit it with a good squeeze of fresh lemon juice while it’s still hot. That little bit of acid cuts through the richness and makes the whole thing pop.
Start to finish, you’re looking at maybe 8-10 minutes, which is about the time it takes to decide what you’re even in the mood for.
Tips for the Crispiest Results
• Dry the cheese first. Moisture is public enemy number one for a crispy crust, so pat those slices dry before they hit the pan.
• Don’t crowd the pan. Give each piece some space so steam can escape and the crust actually forms.
• Stick to medium-high heat. Go too hot and the outside burns before the middle softens; too low and you’ll end up with something pale and greasy instead of golden.
• Eat it right away. Halloumi is best the second it comes off the heat. Let it sit too long and it firms up, losing that squeak-and-crunch thing that makes it fun.
• Go easy on added salt. The cheese is plenty salty on its own — taste before you grab the shaker.
Ways to Serve It
Half the fun here is figuring out where to put it. A few of my go-tos:
• Just on its own, drizzled with honey or hot sauce, for a sweet-salty (or spicy) little appetizer.
• On top of a salad, still warm from the pan, with greens, tomatoes, cucumber, and a lemony dressing.
• Stuffed in a wrap or pita with hummus, roasted veggies, and a little mint for lunch.
• Next to some eggs for a breakfast plate that actually keeps you full.
• On a grain bowl with couscous, roasted chickpeas, and tahini.
If you’re putting together a bigger, more plant-forward spread, this fits right in alongside other flavorful vegan recipes — roasted vegetables, a herby grain salad, a bright tabbouleh, whatever. The salty crunch of the halloumi is a nice contrast against lighter, veggie-heavy dishes.
Frequently Asked Questions
Can I make this without oil? You can dry-fry it in a non-stick pan since halloumi has enough natural fat to crisp up on its own, but a little oil helps with browning and keeps things from sticking.
Why is my halloumi rubbery instead of crispy? Usually it’s one of three things: the cheese wasn’t dried well enough, the heat was too low, or it sat around too long after cooking. Eat it hot and you’ll get the best texture.
Can I bake or air-fry it instead of pan-frying? Sure, both work. Air-fry at around 375°F for about 8 minutes, flipping halfway, and you’ll get similar results. Baking’s fine too, though pan-frying still gives you the most even, deeply golden crust.
How long do leftovers keep? It’s really best fresh, but leftovers will hang on in the fridge for a couple of days. Reheat in a dry skillet to bring some of that crispiness back.
Final Thoughts
It’s kind of wild how much flavor comes out of a recipe this stripped-down. A handful of ingredients, barely any time, and it works in just about any meal — appetizer, salad topper, sandwich filler, breakfast side, you name it. Once you’ve had crispy halloumi fresh out of your own pan, the cold, packaged stuff just doesn’t hit the same. Give it a shot next time you’re craving something quick, salty, and downright hard to stop eating.